Showing posts with label precuts. Show all posts

Friday, November 17, 2017

Sloops

I'm so excited to finally share my Sloops quilt.  I pieced this back in 2015 and then quilted it this spring as part of my whirlwind wrap up before Laurena sold her longarm rental business but I kept waiting and waiting to visit the perfect waterfront local for my photoshoot.

With the end of the year rapidly approaching I dragged it along on this year's Camp Stitchuate trip and finally got my pics.  I wanted everything to be perfect so in the magic hour before sunset we took a break from sewing and headed down to the lighthouse.  Don't be fooled by those laughing faces, it was bitterly cold and windy and this quilt is huge so wrestling it into submission was a challenge.  I have the most amazing friends!!!

The unequal borders look a bit strange when you see this hanging but unlike most of my quilts this one was actually designed to go on a bed.  It works perfectly with Dex's bed with plenty of length for a pillow tuck and to cover the bed frame.

And you know how I love a striped binding!


Ready to sail off into the sunset with this week's Finish it Up Friday by Crazy Mom Quilts.

Quilt Stats:
Finished quilt is 88" x 92"
Pattern: Sloops by Frivolous Necessity.
Fabrics: Boat House by Sweetwater for Moda.  Kona Snow.
Batting: Quilter's Dream Orient.
Thread: Superior Threads King Tut in Papyrus (972).
Quilting: Serpentine by Anita Shackelford.


Wednesday, October 14, 2015

W.i.P. Wednesday: Gone Overboard

I seem to have to have gone totally overboard for these Sweetwater Boat House fabrics.  After finishing up my Sloops flimsy I still had a pretty good sized pile of scraps and I couldn't cast away.

One downside of layer cakes is none of the pieces are bigger than 10" so I've had to get creative with the designs.

This pillow is a sized down version of Camille Roskelley's Cheerio pattern.  I added some sashing between the blocks to give it a bit of breathing room.  I love the way the circles look like life rings.

I've been playing with nautical flags for awhile and have been meaning to make monogram pillow.  For this one I swapped the yellows for aqua and spelled out Dex's initals, DSG.  Since the middle S was white on the outside I added the thin red border to define each flag.

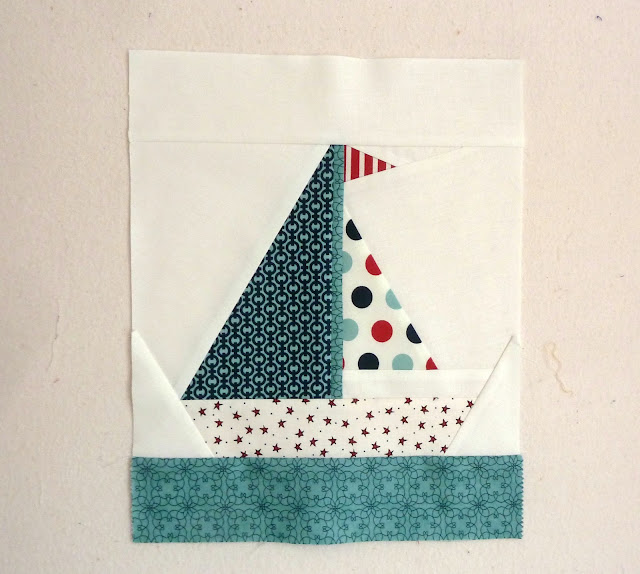
And I had an extra sailboat block that is working it's way in to a wall hanging...  who know what else I'll come up with:-)

WIP Wednesday at Freshly Pieced
Sailing along with this week's W.i.P. Wednesday:-)

Friday, October 9, 2015

Fleet Week

The fleet has landed!  I had some very minor surgery this week and while the actual procedure was a total peel me off the ceiling horror show the recovery has actually been a breeze.  And so, my carefully blocked out convalescence turned into a sewing marathon.  For two blissful days (I did get some really awesome happy pills!) I had nothing to do but sew up sailboat blocks and binge watch Gilmore Girls.

Once I figured out the cutting plan putting these blocks together was a breeze...  And ripping out all that paper was very therapeutic:-)

The setting was what originally drew me to this design.  I love the way the boats nest together and create a wavy look.  Words can't describe how much I love this one, and that's not just the happy pills talking;-)

Now that I've added the borders it's huge but I wanted it to fit on Dex's bed.  That's what I get for giving my kids queen sized beds:-)  This one is definitely too big to quilt on my Bernina so I really need to get some longarm time scheduled.  My TBQ pile is running over!

Linking up to the fabulous Finish it Up Friday by Crazy Mom Quilts.

Thursday, October 8, 2015

W.i.P. Wednesday: Setting Sail

One of my goals for this year was to use up all the precut collections I've got hanging around in my studio.  While I like them in concept I find them really hard to work with.  Still I couldn't resist this Boat House collection by Sweetwater and when I stumbled across this Sloops pattern on Pinterest I knew it was meant to be.

While this pattern is layer cake friendly the instructions are not.  There are also no cutting instructions included for the blocks.  I'm really glad I took the time to make a test block to verify my cutting plan before I started chopping up my layer cake.  Here are my suggestions if you decide to make this quilt for yourself.

From your background fabric cut 39 of the following:

   Piece 3 - 6 1/2" x 5 1/2"
   Piece 5 - 1 1/2" x 4 1/2"
   Piece 8 - 8 1/4" x 5 1/4"
   Pieces 10 & 11 - 4" x 2 1/2" (for a total of 78)
From you layer cake cut 39 of the following: (I did these in stacks of 5)
   Piece 9 - 2 3/4" x 10"
   Piece 6 - 7 1/4" x 1"
   Piece 7 - 7 1/4" x 4 1/2"

For your first block you will also need to cut 1:
   Piece 1 - 3" x 2" from print
   Piece 4 - 5 1/2" x 3" from a different print
   Piece 2- 2 1/2" x 4" from background

You don't need to cut all 39 of these pieces because you will be able to use trimmings from your blocks for these pieces.

When you trim after adding piece 5 you will be left with a triangle that is perfect for future flags.

Also, the piece remaining after you trim piece 8 is exactly the right size for another smaller flag 4.

Finally, when you trim your final block you will be left with background triangles that will fit in piece 2.  I do find pieces 2 and 3 to be the most awkward to sew.  Once you get past those the block is a breeze.

I have to admit I'm not usually a fan of the revolving rotary mat but for squaring up these blocks it's a life saver!

I'm making progress but the depressing thing about paper piecing is once you've done a few you have a pretty good idea how long it takes to make each block.  These average about 30 minutes a piece so I'm looking at 15 more hours of sailboat construction.  I see a movie marathon in my future:-)
WIP Wednesday at Freshly Pieced
Better late than never, linking up with this week's W.i.P. Wednesday:-)

Friday, September 25, 2015

A Walk in the Park

Another one from my Q3 list for the 2015 Finish Along hosted by On the Windy Side.  This one has been a long time coming! I started it on the 2014 BMQG retreat. Then I dragged it back to baste at this year's retreat.  The blocks were made from a Central Park layer cake using this awesome Garden Fence tutorial by Hyacinth Quilt Designs.

For the quilting I used loopy flowers in the centers of each green square.  I didn't do a very good job filling the space but I still love this pattern.  I wanted the yellow bricks to really pop so I filled the printed blocks with free-form feathers.  They're not perfect but I'm pretty happy with how they turned out and will definitely use them again.  I must have got a magic spool of Aurifil for this one...  no thread emergencies, in fact I still had half a spool left after I quilted all the feathers.

I was angling for a trip to Central Park for the photo shoot a la Murray the Whale but had to settle for a visit to our local arboretum.  I'm always grateful for beautiful "summer" days like this.  Fall is NOT my season so I hang on to summer as long as I can.

A huge thank you to A Smidgen of Joy and A Quilting Jewel for sharing their stash where I was a bit low!!!  I truly couldn't have done this without you:-)

I don't usually get too fancy piecing my backs but in the interest of using what I have I made a couple extra blocks to stretch the zoo animal yardage I had in my stash.

I was so proud of myself for piecing the label in to the back when I made it.  Obviously I was a bit optimistic about the finish date... better late than never!

Linking up to the fabulous Finish it Up Friday by Crazy Mom Quilts.

2015 FAL at On the Windy Side
Quilt Stats:
Finished quilt is 58" x 80"
Pattern: Garden Fence tutorial by Hyacinth Quilt Designs
Fabrics:  Central Park by Kate Spain for Moda,  FSDS Olive.
Batting: Quilter's Dream Orient Bamboo
Thread: Aurifil 50wt. in Natural White (2021) and Light Leaf Green (1147)

Friday, April 17, 2015

New Addition

Another quilt from my Plus quilt craze rescued from the UFO pile.  I took this on retreat last winter but only managed to quilt the center section.  I picked it up again in the summer but somehow still didn't manage to finish.  I found it again unpacking from this year's retreat and decided it was finally time to finish it up.

I had enough scraps leftover to get a little fancy on the back.  I'm determined to use up every last bit of this collection!

I don't have a recipient for this at the moment but I'm sure it'll end up in a good home:-)

Linking up to the fabulous Finish it Up Friday by Crazy Mom Quilts.

Quilt Stats:
Finished quilt is 43" x 53"
Fabrics: Pure Boy by Sweetwater for Moda, Kona Eggshell.
Batting: Quilter's Dream Orient Bamboo
Thread: Aurifil 50wt. in Ermine (2312)

Saturday, February 28, 2015

Layered

This week I whipped up this little Layers of Charm quilt from Fat Quarter Shop.  I've been feeling a bit stuck creatively and usually just sewing something gets my creative juices flowing.

I pulled out all my layer cakes and decided this was a good way to finally use this Daisy Cottage layer cake I bought at Quilt Market ages ago.  This layer cake didn't have the standard 40 squares so in the end I pulled 16 to make a smaller sized quilt.  I shopped my stash and decided this grey print from Fox Field would be perfect for the 5" squares.

I did NOT want this taking up residence in my UFO pile so I immediately basted it and used it to practice my FMQ.  I went with a loopy meander, a nice fast pattern that doesn't eat thread:-)

This quilt was made 100% from things I already had in my studio.  For the back I pulled this little bird print Audrey had used to make pajama bottoms from my stash.  I had just enough of it and I love the whimsy it adds.

Since I was on a roll I used this tip from Riddle & Whimsy for making bonus HSTs from the side triangles and put them together into a pillow cover.

Several of my friends participated in this blog hop so check it out to see more lovely examples of this quick and easy pattern.

Quilt Stats:
Finished quilt is 38" x 38"
Pattern:  Layers of Charm by Fat Quarter Shop
Fabrics: Riley Blake Daisy Cottage Layer Cake, Baby Geo from Fox Field by Tula Pink.  Backing Timeless Treasures Bon Voyage.
Batting: Quilter's Dream Orient Bamboo.
Thread: Aurifil in Peachy Pink (2435).

Friday, February 6, 2015

Twofer

I busted my first UFO of the year!!!  I put together this top last winter during my plus quilt phase.  Most of the fabrics are what was left of a Rouenneries Deux jelly roll with some scraps thrown in for good measure.

My original plan was for crosshatching but once I finished the first side I decided I was done happy with it.  It's a more modern ascetic;-)  Jacquie Gering has some great tips for straight-line quilting on her blog.  It was too cold for a trip to the hardware store for 1 1/2" wide tape but next time I go I'm going to stock up...  only marking every other row would definitely speed up the process!

I used 28wt. Aurifil thread to make the the straight line quilting a bit bolder.  I love the extra texture it adds to the simple design.

I was a little discouraged with this one after my binding debacle but look how perfectly these stripes lined up on the back!

I got a bit distracted while I was trying to finish this and ended up also making a pillow cover with the last of my French General scraps.  And now I have two for the price of one;-)

Linking up to the fabulous Finish it Up Friday by Crazy Mom Quilts and another check off my list for the 2015 Finish Along with On the Windy Side.

2015 FAL at On the Windy Side

Quilt Stats:
Finished quilt is 46" x 46"
Fabrics: Rouenneries & Rouenneries Deux by French General.  Assorted scraps.
Batting: Quilter's Dream Orient Bamboo.
Thread: 28 wt. (grey spool) Aurifil in Light Beige (2310).

Friday, January 30, 2015

In a Flurry

Better late than never...  I finished up this cute little Christmas quilt.  After almost no snow this winter we suddenly got six inches of snow last weekend, the perfect backdrop for a photo shoot.  I cashed in some of my birthday chips to enlist my DH as a quilt stand.  Good thing, it hasn't stopped snowing since and now we'd be buried under a snow drift!

I started this quilt right before we left for Christmas vacation.  I was in desperate need of some mindless sewing after all the deadlines and fussiness of my holiday sewing.  I spotted this collection of Kate Spain holiday charm packs in my stash and got sewing.

I didn't want to deal with anything complicated and wanted to use up as many charms as possible.  I just randomly grabbed pairs of charms, sewed them together and then stuck them on the wall.  Without getting too thinky about it I just kept sewing pairs together into bigger units until I had strips of 12 blocks which seemed like a good throw size.

To stretch things and give all the prints some breathing room I alternated with solid white squares on the odd rows.  I love the almost gingham effect it adds with minimal effort!

For the quilting I just went with straight lines a 1/4" from the seams.  It was a bit tedious but was helped along by the final season of The Closer.

And there's my first finished quilt of 2015...  just in time for Christmas:-)

Linking up to the fabulous Finish it Up Friday by Crazy Mom Quilts and making my first check on the 2015 Finish Along with On the Windy Side.

2015 FAL at On the Windy Side

Quilt Stats:
Finished quilt is 58" x 76"
Fabrics: Solstice, Flurry, and 12 Days of Christmas charm packs by Kate Spain, FSDS Mist.
Batting: Quilter's Dream Orient Bamboo.
Thread: 50 wt. Aurifil in Light Beige (2310).